Forth and last past of my tutorial on creating a WordPress Theme without having to deal with any PHP code.
Previous parts:
- Build a child theme based on Thematic Framework Theme
- Style header, footer and posts
- Style navigation and widget areas
In this part we will style the Superfish (JQuery-powered) drop down menu inherited by Thematic Framework parent theme.
But, before proceding to the menu we will add some retouches to the page styles.
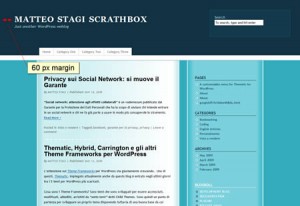
/* by removing #branding width we move blog-title on the left of the page*/
#branding {
width:auto;
margin-left:60px; /* let's add some margin though*/
}
/* a new set of paddings for #branding to overwrite the defaults*/
#branding {
padding:60px 0 80px;
}
Blog title and blog description are contained in the #branding div. This div is centered to the content area, by default. The above code let us move blog title and blog description to the leftmost part of the whole page. By adding some margins we just moved them a little away from the edges.

We now style also post titles, post header and post footer.
/* font styles for post titles */
.entry-title {
font-family:'Century Gothic',Futura,'URW Gothic L',sans-serif;
font-size:24px;
font-weight:normal;
color:#113242;
}

/* color must be defined also on links */
.entry-title a{
color:#113242;
}
We changed the default font face for post titles. NOTE: I used ‘Century Gothic’ that is not a 100% Web Safe font. That’s means some user could see blog title in Futura or in a generic ‘sans-serif’ if they do not have installed these fonts on their computer. I wrote a post on Web Safe fonts but it is in italian. I suggest you to learn more on Web Safe fonts and alternatives (sIFR, FLIR, Cufont, etc) by searching this terms on Google.
We reset also colors for post-header (.entry-meta) and post-footer (.entry-utility) content:
/*color of Post Header and Post Footer*/
.entry-utility, .entry-utility a, .entry-meta, .entry-meta a {
color:#4A7D85;
}
Reset all a:hover colors
We defined color links but the mouse over color is still orange as in the default theme (except for the main aside areas where we have already defined a:active and a:hover styles – see previous parts of tutorial)
/* we have not yet changed the hover color of all general links */
a:active, a:hover {
color:#113242 /* deep blue as for links on #primary */
}
This, unfortunately is not enought to get rid of all orange mouse over effects. On the Thematic default theme the orange over color is defined several time (too much times, I guess – sorry Ian). For istance: entry-utility a:active, .entry-utility a:hover {color:#FF4B33;} on line 331 of default.css. These rules have more specificity than ours. So we have to reset each one.
/* but we have also to overwrite specific links hover colors that are defined by defaults */

/* TOO MUCH CODE */
/*.page-title a:active, .page-title a:hover, .entry-title a:active, .entry-title a:hover .entry-meta a:active, .entry-meta a:hover, .entry-utility a:active, .entry-utility a:hover, .page-link a:active, .page-link a:hover,.page-link a:active, .page-link a:hover, #comments-list .comment-meta a:active, #comments-list .comment-meta a:hover, #comments-list .comment-meta a:active, #comments-list .comment-meta a:hover, .comment-navigation a:active, .comment-navigation a:hover, .comment-navigation a:active, .comment-navigation a:hover{
color:#FF4B33;
}
*/
I would prefer this solution:
Use the !important declaration
by using the !important declaration the rule is applied no matter of the specificity of the associated selector.
/* let's do so, instead */
a:active, a:hover {
color:#113242 !important/* deep blue as for links on #primary is for ALL links*/
}
That’s means use ALWAYS this color.
/* but this overwrite also our previous defined styles so we have to rewrite them in that way */
#secondary a:active, #secondary a:hover, #subsidiary a:active, #subsidiary a:hover, #blog-title a:active, #blog-title a:hover{
color:#FFF !important
}
#siteinfo a:active, #siteinfo a:hover {
color:#FFF !important ;
}
If two or more important declarations involve the same property then the conflict is resolved again using specificity
So we should have added this part of code at the very beginnning of our style.css. But this is a tutorial…

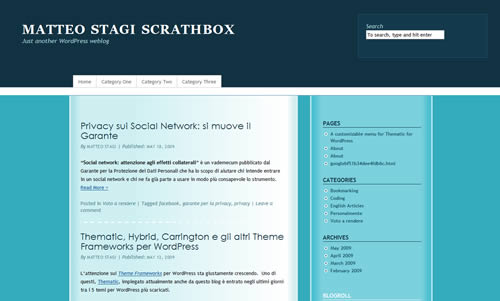
Our theme after last changes
The Superfish navigation Menu
Styiling the menu can be the most challenging job. It’s not easy to inspect the menu code using Firebug because of the dynamic hover classe applied by JQuery.
First of all I do not like that menu is not left-aligned with the content area. This is because the menu is 940 pixel width (line 20 of the thematic inherited 2c-r-fixed.css), while page is 960 pixel width (line 24 of 2c-r-fixed.css).
/*same width of #main to have menu left-aligned with it*/
.menu {
width:960px;
}
Let’add some colors and change font style.
/*items have same background color of #subsidiary #first*/
.sf-menu li {
background-color:#13394C;
}
/*no bottom borders on items. left borders has color used for #subsidiary #first border*. Top border is just a little darker than header background*/
.sf-menu a {
border-bottom:none;
border-top-color:#10303F;
border-left-color:#1D5570;
}
/*same color must be applied to the end-of-menu border*/
.sf-menu {
border-right-color:#1D5570;
}

/*change font style for the menu*/
.sf-menu {
font-size:14px;
font-variant:small-caps;
}
.sf-menu a, .sf-menu a:visited {
color:#FFF;
}
We want to give more space to items tabs. We do it by adding paddings and defining height.
/*we give more space to items tabs*/
.sf-menu a {
padding:13px 28px; /*default is 9px 13px*/
height:24px;
}
We need to change height of menu container div (#access), too.
/*we must change also the height of #access (it's the menu container)*/
#access {
height:51px;
}
We now apply on mouse over styles:
/*on mouse over*/
.sf-menu li:hover, .sf-menu li.sfHover, .sf-menu a:focus, .sf-menu a:hover, .sf-menu a:active {
background-color:#B3E4E9;
}
.sf-menu li:hover a, .sf-menu li.sfHover a {
color: #113242;
}
Superfish is a drop-down menu so we have to style also sub-items.
/*sub-items*/
.sf-menu ul, .sf-menu ul a {
border-color:#4B8AA9;
}

.sf-menu ul a {
background-color:#B3E4E9;
border-left:none;
padding:9px 13px;
height:auto;
color: #113242;
}
.sf-menu li:hover ul, .sf-menu li.sfHover ul {
top:50px;
left:1px;
}
.sf-menu ul li:hover, .sf-menu ul li.sfHover, .sf-menu ul a:focus, .sf-menu ul a:hover, .sf-menu ul a:active {
background-color:#CEF0F2;
}
That’s all.

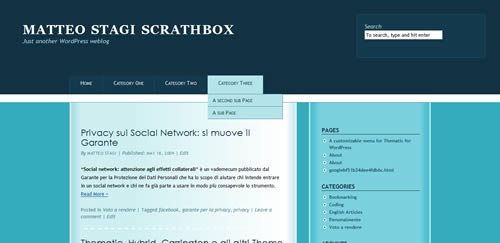
The completed Theme with styled drop-down menu
The comment area
I forgot it! It’s white!
/*I forgot to style the comment area!*/
#respond {
background-color:#AEE2E8;
padding:18px;
border: 1px dashed #4A7D85;
}
#comments h3 {
font-family:"Trebuchet MS", Verdana, Arial, Helvetica, sans-serif;
Ok. We have ended our job. Thanks.

unstyled comment area

styled comment area
6 Commenti
Grazie mille, era proprio il tutorial che cercavo!
Complimenti per la tua chiarissima spiegazione.
Grazie a te Marina per i complimenti. Sono contento che ti sia servito. Se pubblichi un child theme mandami il link che lo visito volentieri.
You out did a lot of tutorials out there. This tutorial is dumb proof. Thanks!!!
Io vado su un arto qui con una traduzione di Google. Scusa per i miei errori.
Seguendo il tuo tutorial ho potuto imparare molto. Il mio “style.css” era simile alla versione scaricata. Tuttavia, entrambi mi danno lo stesso problema: il menu figlio sparire prima che siano in grado di librarsi su di loro. Qualche suggerimento? Grazie!
——————————–
I’m going on a limb here with a Google translation. Apologize for my mistakes.
Following your tutorial I was able to learn a lot. My “style.css” was similar to the downloaded version. However, both give me the same problem; the child menus disappear before you are able to hover over them. Any suggestions? Thanks!
Thank you for a clear guide to customising child themes for Thematic. It was much more helpful than any other websites that I found. I feel that I making progress at last!
Thanks a lot for such a clear tutorial. Great effort!